Active Federation using RIA Services and WIF
12 May 2011
UPDATE: A coworker here at Microsoft has brought up some interesting thoughts regarding this approach, and I’ve added a brief discussion below the second diagram.
Recently I decided to experiment with RIA Services in federated authentication scenarios. For those of you that aren’t familiar with federation, let’s consider the following scenario: my company Contoso builds an expense reporting application that I host in the cloud. One day I get Fabrikam to sign up as a client, and now I have to onboard all Fabrikam employees onto my system. It is true that I could create a login for every employee, but that is impractical because Fabrikam employees have to remember that extra login, and also I would need to keep my list of logins in sync when employees join or leave Fabrikam.
The solution for this is federated authentication, where my app can use a third-party (Fabrikam’s) authentication provider (also known as a Security Token Service or STS) to authenticate users. I won’t try to explain federation from scratch, because Microsoft’s patterns & practices has a great write-up. You can squint and ignore some of the claims stuff as it’s not super relevant to what I’m describing here.
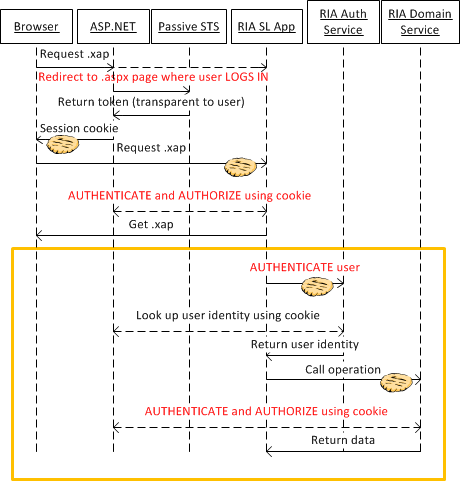
To build an app with federated auth using RIA Services, most folks resort to passive federation, which you might be familiar with from using things like your LiveID login. The passive approach is browser-friendly and uses a combination of cookies, URIs and redirects to log you in to the site you’re trying to access. The downside in the case of Silverlight is that you cannot complete the login inside your app: you have to navigate away from the Silverlight control, type in your credentials into a HTML (or ASPX) page, and then be bounced back by your browser to reload the control. Another downside is that you need to host a HTML page for the user to type in their credentials, in addition to the Silverlight app and the web services, which might not be desirable.
The following diagram has a more detailed explanation of the exact flow that happens during the passive scenario:
From what I’ve seen, most folks use this passive pattern with RIA today. Eugenio Pace’s blog has a few great write-ups and demos that you can try out. Some are a bit dated, but you should be able to find your way around.
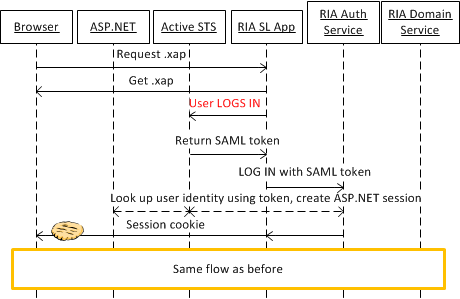
What I wanted to try out was the active federation case, in which the Silverlight app talks dirctly to the identity provider. This has the benefit of having the user type their credentials directly into the Silverlight app, without having to leave the page, which results in a more polished and faster user experience. Eventually, as the crypto support in Silverlight improves, it may end up being a more secure solution as well, if we are able to encrypt and sign the tokens that are being exchanged. The following diagram demonstrates the slightly different message flow in the active case. Note that the app itself is doing most of the work, not the browser.
Some interesting considerations emerged in conversation with Robert O'Brien, an architect here at Microsoft. Please consider these before building your own app:
- One of the things we gain in this approach over a passive federation approach is the ability to log the user in from inside our UI. That provides for a better user experience, but it also puts the burden on our app to expose a credentials UI and pass the token over to the service. Potentially this could be a security risk for our app. Some folks believe that this goes against the spirit of federated authentication since it takes control away from the identity provider.
- The implementation shown here relies on WS-Trust as the protocol for the token. Unfortunately in today’s federated web, it seems like only ADFS and maybe OpenID servers honor that protocol. If you are trying to use WS-Trust and use Facebook/Yahoo/Google (either directly or through Azure’s Access Control Service) as the identity provider, you will find that WS-Trust is probably not supported. So outside the enterprise environment, this approach might not work.
Now some specifics of the sample. It’s a simple master/detail application that allows you to display and edit data. There are two registered users fabrikam\yavor and fabrikam\test and the password for both of them is 12345. If you don’t log in and try to display the data, you will get an error because of the EnableClientAccess attribute.
[RequiresAuthentication]
[EnableClientAccess()]
public class CustomersService : LinqToEntitiesDomainService<AdventureWorksLT2008R2Entities>;
All authenticated users can view the data, but only users in the Editor role can make changes to it. Only the user fabrikam\yavor is in that role.
[RequiresRole("Editors")]
public void UpdateCustomer(Customer currentCustomer)
The bottom line here is that even though we have a STS with external user authentication, we kept authorization local to our app (we use ASP.NET roles). That’s a choice you can make as a developer - you can also externalize the user roles (or claims) as part of the STS, or keep them local.
There are lots of extra details in the app, which you’ll see by exploring the source.
The code is available here. Note that you need the following installed on your machine for it to work:
- Visual Studio 2010
- SQL Server 2008 R2 Express
- SQL Server 2008 R2 Management Studio Express
- WCF RIA Services V1 SP1/SP2
- Windows Identity Foundation Runtime
- The AdventureWorks LT 2008R2 database for SQL Server Express 2008 R2
Here are some additional notes on the structure of the sample:
- First, please run the included SetupCertificates.cmd script inside the Scripts folder
- The solution will create two applications in your local IIS instance: AddressBookFederatedAuth and IdentityProviderAndSts. Make sure you launch Visual Studio as Administrator, so it has permission to create those. Also make sure you enable HTTPS so both of the applications in the IIS Manager
- Change the Application pool under which those applications are running to use the Network Service account.
- Use SQL Server Management Studio, make sure Network Service is added as a login to your SQL instance. When you add the account, make sure you give him some sane Server Roles (for example sysadmin). Let me know in the comments if you find any of these steps difficult and I can provide more detailed instructions.
I want to credit Eugenio Pace, Kyle McClellan, and the folks behind the Identity Developer Training Kit, from where I shamelessly stole some code.