Silverlight Firestarter demo
09 December 2010
In my previous post I linked to the video and slides from my talk. This point contains the code sample, which is available here.
Setting up your machine
Here is what you need on the machine before you get started:
- Windows 7
- Visual Studio 2010
- Silverlight 4 tools for Visual Studio 2010
- SQL Server 2008 Express (which I’m pretty sure comes with Visual Studio 2010 by default)
- IIS7
Before you proceed, make sure the user account under which SQL Server Express is running is NETWORK SERVICE. If you don’t remember how this was installed, open up Task Manager (make sure you select “Show processes from all users”) and look for the sqlsevr.exe process. If you find that you need to change the user, this topic on MSDN should come in handy.
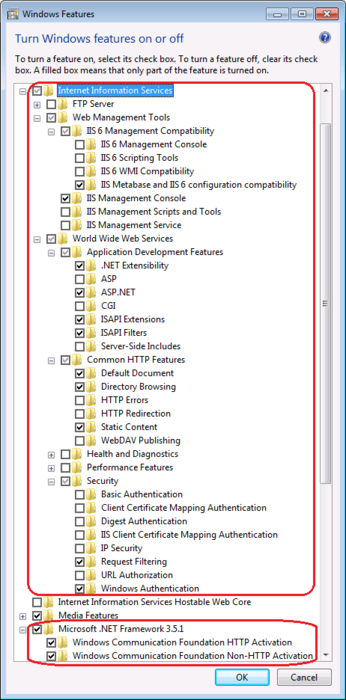
The other tricky part is installing/configuring IIS. Go to the search box in the Start menu and type “Turn Windows features on or off”, then select top result. In the box shown, make sure the following are checked.

Deploying the basic app
- Download the zip file and unzip the content in a folder such as C:\Firestarter. It is actually very important to download this in a location other than your C:\Users\YourUser folder, due to an apparent bug with SQL Server Express.
- Open Visual Studio as Administrator and open the solution file. You will be prompted to create a new website in IIS, and you should agree. If this succeeds you should see the solution open with both projects loaded correctly. But we’re not quite done yet.
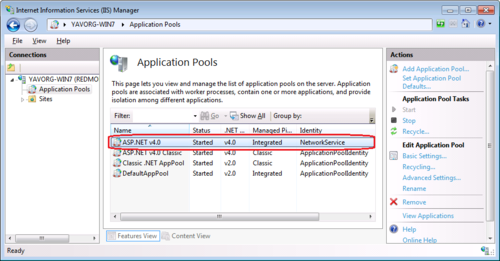
- We need to make sure the account under which IIS is running has access to SQL Express. Go into the IIS Manager (type inetmgr into the Start menu search box) and click on Application Pools. Find the ASP.NET v4.0 application pool and then select Advanced Settings on the right side. Find the Identity row and change that to NetworkService.

- We also need to make sure that the NETWORK SERVICE user has access to the location where we put our files. Let’s assume you used C:\Firestarter as I recommended above. Go to the the folder properties, then go to the Security tab. NETWORK SERVICE is part of the Users group on any machine, so we can just make sure that the Users group has read and write permission. If you don’t see the Users group go ahead and add the NETWORK SERVICE account explicitly here and give it read and write permission. Make sure the permissions are inherited all the way down, especially to the App_Data folder and the .mdf files inside that folder. You should double-check that every .mdf file allows the Users group or the NETWORK SERVICE account read and write permission. Otherwise you will get a stream of inexplicable errors as you attempt to follow the rest of this post.
You should now be able to hit F5 in Visual Studio, the application should pop up and you should be able to see the book categories and click on individual books.
At this point you can also try and use the demo to enable the debugging features I cover in the video.
Setting up Windows Authentication
Needless to say, before we can demonstrate this scenario, we need to make sure the machine we are using is joined to a domain.
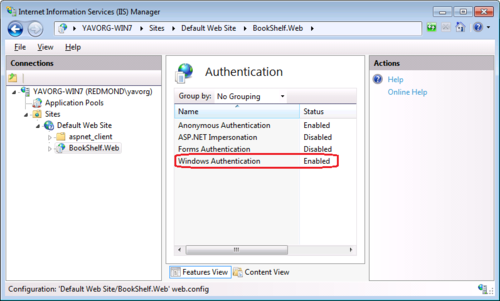
We need to do the IIS configuration step that I refer to in the video, but I don’t show. We can open IIS Manager and find our web application, then double-click the Authentication icon and make sure Windows Authentication is enabled.

We can then follow the rest of the steps as shown in the video. One exception is that instead of my personal domain credential, you will need to specify your own domain credential in the BookService.svc.cs code behind file. In the download I’ve changed it to domain\user.
Setting up Forms Authentication
Before we can get this to work, we need to first configure our website for access over HTTPS. Like I mention in the video, this authentication scheme requires HTTPS.
- Back in IIS Manager we need to enable HTTPS on the Default Web Site bindings list. You can follow this tutorial by ScottGu.
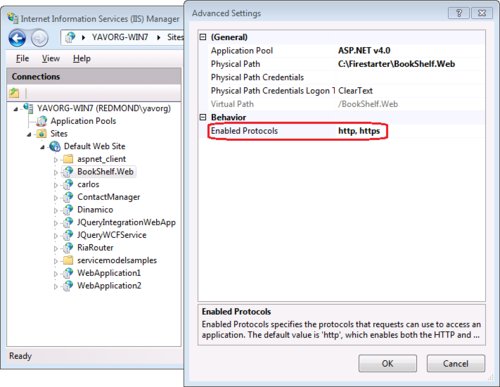
- Once the HTTPS binding is created for the parent website, we need to enable the HTTPS protocol for our BookService.Web site. We can do that by going to Advanced Settings and adding https in the list of Enabled Protocols. The values are comma-separated in case you were wondering.

- If you end up using a self-signed certificate, realize the IE will display an error page warning you that the cert is not signed. That means that any calls that Silverlight tries to make to that page will be blocked automatically. The easiest way to fix this is to go over to Internet Options > Advanced and in the Security section deselect “Warn about certificate address mismatch”. Don’t forget to restart IE afterwards, and most importantly, don’t forget to reenable this option when you are done playing with the demo.
- The last thing we need to realize is that we will be accessing the SL application over HTTP, but internally it will be making calls to HTTPS services. This is cross-scheme access and is normally disabled, even for same-domain calls. To address this we need a special clientaccesspolicy.xml file, which we place at the root of our IIS install, in my case that is C:\inetpub\wwwroot. The file looks like this:
<?xml version="1.0" encoding="utf-8"?>
<access-policy>
   <cross-domain-access>
      <policy>
         <allow-from http-request-headers="SOAPAction">
            <domain uri="http://localhost"/>
         </allow-from>
         <grant-to>
            <resource path="/BookShelf.Web" include-subpaths="true"/>
         </grant-to>
      </policy>
   </cross-domain-access>
</access-policy>
Once all of this is done, we can go ahead and follow the steps in the video. Please look carefully at both Web.config and ServiceReferences.ClientConfig to make sure you comment out all sections that refer to ASP.NET authentication.
That is it, please let me know if you hit any issues in the comments.
Cheers,
-Yavor